|
 As
the remaining 78 & 79 Broncos still on the roads get older and older
and rack up more and more miles, one of the most dangerous things that
go wrong with our trucks is play in the steering that seems to get worse
and worse over time. There are many components in the Bronco steering
system that contribute to this problem, but one of the first things that
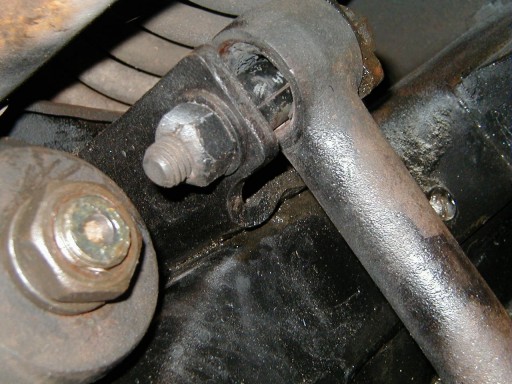
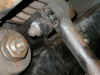
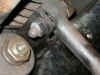
should be replaced are the bushings in the Axle Track Arm. If you look
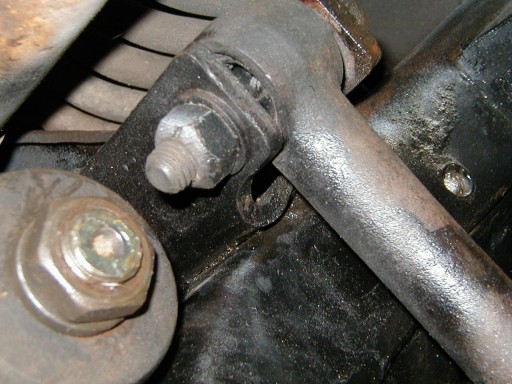
at Figure 1 and 2 below, you can see that one of the bushings in my
track bar was almost completely gone! My steering was so sloppy that
even after replacing the power steering box, shaft, and flex coupler I STILL
had to turn the wheel almost a 1/4 turn before the steering would
respond. All of this play was caused by worn out bushings in the axle
track bar. As
the remaining 78 & 79 Broncos still on the roads get older and older
and rack up more and more miles, one of the most dangerous things that
go wrong with our trucks is play in the steering that seems to get worse
and worse over time. There are many components in the Bronco steering
system that contribute to this problem, but one of the first things that
should be replaced are the bushings in the Axle Track Arm. If you look
at Figure 1 and 2 below, you can see that one of the bushings in my
track bar was almost completely gone! My steering was so sloppy that
even after replacing the power steering box, shaft, and flex coupler I STILL
had to turn the wheel almost a 1/4 turn before the steering would
respond. All of this play was caused by worn out bushings in the axle
track bar.
| Click on each thumb nail to enlarge |
|
|
|

|
|
Fig
1.
Play
in bar
towards
the rear |
Fig
2.
Play
in bar
towards
the front |
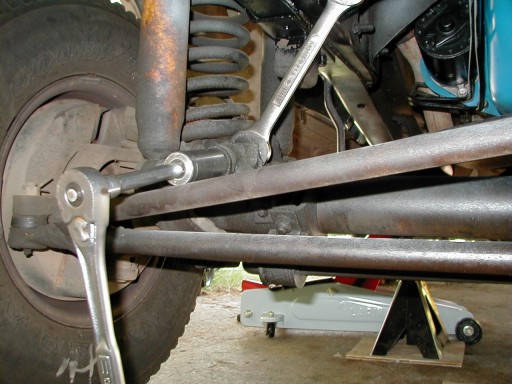
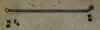
Fig
3
The
way the bar
should
look |
Almost
every single suspension company out there sells replacement axle track
bars for the 78 & 79 Bronco. However, they are VERY expensive (SkyJacker's
Adjustable arm cost well over $100.00 the last time I looked and even a
factory replacement arm from TRW (P/N DS917) cost
$60.00. However, if
your Bronco is not lifted over 3" then you will not need an
adjustable track bar. All you have to do is replace the bushings in your
original bar.
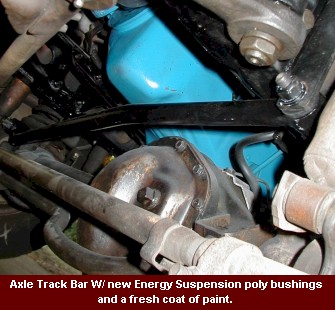
 So,
I called Performance Suspension Technology and priced Energy
Suspension's replacement Hyperflex polyurethane bushings for my track
bar (P/N 4.7108g) The price was
right, just $10.95. So I bought a set and decided to give them a
try. So,
I called Performance Suspension Technology and priced Energy
Suspension's replacement Hyperflex polyurethane bushings for my track
bar (P/N 4.7108g) The price was
right, just $10.95. So I bought a set and decided to give them a
try.
So,
I'll explain how the installation went first and then go into detail
about the bushings. To install your new bushings, follow these steps:
 |
Step
One -- The very first thing to do is to squirt some WD-40 on
the two nuts holding the bar in place AT LEAST 24 hours
before you remove the bar. I had a hell of a time getting this bar
off until I sprayed WD-40 on the nuts and let it sit for a week.
After that, the nuts came right off. |
|
Step
Two -- Make sure you have the following tools and parts:
|
A
1 1/8" deep-well socket and a 1 1/8" open-end
wrench for the axle bolt & nut |
|
A
13/16" deep-well socket and a 7/8" open-end wrench
for the frame side bracket. |
|
A
new cotter pin |
|
A
heavy-duty torque wrench capable of AT LEAST 200 ft-lbs of
torque. |
|
|
 Step
Three -- Jack up the right (passenger) side of the Bronco so
you will have room to insert the 1 1/8" open-end wrench onto
the axle bolt behind the track bar. Support the Bronco w/ a
heavy-duty SUV or light truck jack stand under the control arm
bracket. I also a put 2 1/2 ton floor jack under the frame for
safety. You really don't want a truck this heavy to fall!!! Step
Three -- Jack up the right (passenger) side of the Bronco so
you will have room to insert the 1 1/8" open-end wrench onto
the axle bolt behind the track bar. Support the Bronco w/ a
heavy-duty SUV or light truck jack stand under the control arm
bracket. I also a put 2 1/2 ton floor jack under the frame for
safety. You really don't want a truck this heavy to fall!!!
|
|
Step
Four -- Remove the cotter pin from the axle nut and place the 1 1/8" deep-well socket and AT LEAST a 1/2"
socket wrench on to the nut and place the 1 1/8" open-end
wrench on the head of the bolt behind the bar. Remove the nut but
do not remove the axle bolt yet. When the nut is
off, lower the Bronco with the bolt still in place back to the ground. |
|
Step
Five -- Place the 7/8" open-end wrench on the front of
the frame nut and place the 13/16" deep-well socket on the
frame bolt behind the bar. I had to use two 8" long
1/2" extensions so that the socket wrench was behind the left
front tire. I also placed three short 2x4 pieces of wood on top of
the left-side control arm so I could rest the socket wrench on the
wood while a broke the bolt loose with a cheater pipe I slipped
over the socket wrench. |
|
Step
Six -- Once both nuts have been removed from the axle and frame side of the
track bar, go ahead and slide the axle side bolt out and then the
frame side bolt out and remove bar. It should slip right off. Be careful
when you remove the bar. It's heavier than it looks!!! |
|
Step
Seven -- Since one of my bushings was almost completely gone,
I only had to remove the bushing on the axle side of the bar. I
used a 1/8" drill bit and drilled holes all the way around the old
bushing until the rubber was loose enough to remove with a screw
driver. I've heard of people "burning" out old bushings
with a blow torch, but I was hesitant to use this method. |
|
Step
Eight -- Once both bushings are removed, smooth out the inside
diameter (ID) of the bushing eyes with very fine 400 grit sand
paper to remove any rust or minute scratches in the bushing eyes.
If you accidentally scared the eyes with a screw driver or the
drill bit (like I did), make sure you file down the scar with a
round or half round file before you smooth out the eye with the
sand paper. Also, make sure to clean the bushing eyes with a clean
rag and some mineral spirits to remove any remaining grease or
dust. |
|
Step
Nine -- Included with your new bushings is a pack of silicone
grease. The instructions that came with the bushing were very poor
but I believe you're supposed to smear the grease on the following
components:
|
Grease
the ID of the track bar bushing eyes. |
|
Grease
the OD of the bushings. |
|
Grease
the OD of the bushing sleeves. |
|
In
other words, grease all of the areas where the bushings will come in
contact with metal. Do not grease the ID of the bushing sleeves!!!
Once you have applied the grease, simply slip the bushings in each
side of the eyes and insert the metal sleeve. My bushing went right in
and I did not have to use a press.
|
Step
Ten -- Install the axle side of the bar first. Do not tighten
down the nut yet. |
|
Step
Eleven -- In order to install the frame side of the bar, I had
to literally push the Bronco to the left (driver's side) to get
the body to line up with the axle. I was able to do it by my self
by griping the frame and "pulling" the body over until I
could slip the frame side bolt into place. If you have someone to
help you, just have them push on the passenger side of the Bronco
or have them turn the steering wheel slightly to the right to line
up the body with the axle. |
|
Step
Twelve -- Torque the axle side nut to 155-205 ft-lbs and the
frame side nut to 119-161 ft-lbs. On the axle side nut, I torqued
it to 170 ft-lbs first and checked to see if the cotter pin would
line up with hole. I got lucky and it went right in the first
time. However, if it didn't, I would have kept tightening the nut
just a little more until the cotter pin would line up with the
hole. Also, I had to jack up the Bronco again (just like in step
three) so I could get the 1 1/8" open-end wrench on the head
of the axle bolt so it would not turn when I torqued it down. Special
Note: Make sure you check the shock tower that the frame side
of the axle track bar attaches to for cracks and loose bolts. My
axle track bar was putting so much stress on the shock tower with
that bushing gone that it actually jarred the shock tower loose!!!
I had to remove the shock absorber on that tower and remove the
left wheel so I could have the access I needed to tighten the
shock tower mounting bolts. |
Okay!
So, how does the bar with new bushings work??? Well.... great!!! I have absolutely
no play in my steering at all. None. It doesn't even feel like a Bronco
anymore! What a difference! This was the best $11.00 I've ever spent in
my life. This Bronco has never, ever steered this well before, even when
I bought it in 1988. I STRONGLY recommend replacing your old worn-out
rubber bushings with these new polyurethane ones.
Well,
as good as the steering is on my Bronco now, the truck still sways all
over the road, but this because my tires are too small and the rest of
the bushings in the front end are shot. But this is another project
.............
Paul's
Product Score: I give the Energy Suspension bushings a score of 8.9.
Even though the bushings fit very well, were easy to install, and they
meet or exceed what Energy Suspension claims they will do, I had to
deduct points because the instructions were terrible. The instructions
weren't even for the track bar bushings. They were
"generalized" and had one short sentence stating that track
bar bushings are similar to end link bushings and then gave a "cheesy"
exploited view of a couple of poorly drawn end link setups. Maybe I'm
just stupid, but I like well document instructions, especially when I'm
doing something that I have never done before. Surely I can't be the
only one who feels this way.
|
 Steering
& Handling Problems -- Replacing the bushings in the Axle Track Bar W/
Energy Suspension Polyurethane.
Steering
& Handling Problems -- Replacing the bushings in the Axle Track Bar W/
Energy Suspension Polyurethane.